If you want to add a special touch to your baby’s wardrobe, consider how to fold baby clothes into flowers. This fun and creative way to organize tiny outfits not only saves space but also brings joy to anyone who sees them.
Picture a charming bouquet of baby clothes, brightening up a nursery or making a thoughtful gift. Folding those small pieces neatly into flower shapes is easier than you think and can turn a simple task into a delightful experience.
In just a few simple steps, you can create beautiful fabric blooms that impress friends and family alike. Ready to get started? Grab some cute shirts and let’s dive into this cheerful folding adventure!
How to Fold Baby Clothes into Flowers
Folding baby clothes into flowers is a fun and creative way to organize your little one’s wardrobe or make beautiful gifts. This unique technique can turn simple items into charming decorations that add a personal touch to any nursery, baby shower, or gift basket. To get started, all you need are some soft baby clothes, like onesies, shirts, or small blankets.
Begin by selecting the clothes you want to use. Soft materials work best, as they are easy to mold and shape. Once you have your items ready, it is time to dive into the folding process. Here is a step-by-step guide to help you create lovely flower shapes from baby clothes.
Gather Your Supplies
Before you begin folding, make sure to gather everything you need. Here’s a list of supplies that will help you make beautiful flower designs:
- Soft baby clothes (onesies, T-shirts, socks)
- Rubber bands
- Scissors (optional)
- Small decorative items (like beads or ribbons)
- A clean, flat surface to work on
Having everything ready will make the folding process smoother and more enjoyable. It is best to work in a calm space where you can focus on the art of folding.
Folding Onesies into Flowers
Onesies are a great choice for making flower shapes due to their size and flexibility. Follow these steps to create a beautiful flower from a onesie:
Step 1: Lay the Onesie Flat
Start by placing the onesie flat on your surface. Make sure it is smooth and free of wrinkles. This will help you fold it more easily and create even petals.
Step 2: Fold the Sleeves
Take each sleeve and fold them inward towards the center of the onesie. This creates the first layer of your flower petals. The sleeves should overlap slightly in the middle.
Step 3: Roll from the Bottom
Next, grab the bottom of the onesie and start rolling it up tightly towards the neckline. This rolling motion helps shape your flower. Make sure to keep it tight but not so tight that the fabric twists.
Step 4: Secure with a Rubber Band
Once you’ve rolled the onesie all the way up, take a rubber band and wrap it around the base of the flower. This will hold your flower shape together. You can adjust the rubber band to make it tighter or looser based on your preference.
Step 5: Fluff the Flower
Gently pull the sleeves and the fabric around the top to fluff out your flower. This is the fun part, as you get to see your creation come to life! Make any adjustments needed to ensure it looks neat and pretty.
Using T-Shirts to Create Flower Shapes
T-shirts can also be transformed into lovely flower designs. Here’s how you can do it:
Step 1: Lay the T-Shirt Flat
Begin by laying the T-shirt on your flat surface. Smooth out any wrinkles to make folding easier. It’s important that the fabric lies flat.
Step 2: Fold the Sides In
Fold both sides of the T-shirt towards the center. This will help create the petals of your flower. Aim for the edges to meet in the middle but not overlap too much.
Step 3: Roll Up the Bottom
Take the bottom of the T-shirt and roll it upwards towards the collar. Keep the roll tight to ensure the petals stand out nicely. It helps to visualize how the flower shape will appear as you roll.
Step 4: Secure with a Rubber Band
Just like with the onesie, wrap a rubber band around the base of the rolled shirt. Ensure it holds the flower shape well. You can also use more than one rubber band for added support if needed.
Step 5: Adjust the Petals
Now, fluff out the top of the shirt to create distinct petals. You can pull and shape the edges to make it look more flower-like. This gives your flower character and a playful touch.
Creating Flowers from Socks
Socks can also be used to form adorable flower shapes. This technique is perfect for using up mismatched socks or creating small gifts. Here’s how to fold them into flowers:
Step 1: Start with a Sock
Take a clean sock, preferably a colorful one. Lay it flat. Make sure there are no lumps or wrinkles.
Step 2: Roll the Sock from the Toe
Hold the sock by the toe and start rolling it upwards. Roll it tightly to create a compact flower. The toe end will form the center of the flower.
Step 3: Shape the Flower
Once you reach the opening parts of the sock, you will notice some fabric sticking out. This is the ‘petals’ of your flower. Gently pull the fabric to create a rounded flower shape.
Step 4: Secure with a Rubber Band
Use a rubber band to tie the flower at the base. Make sure it is snug enough to hold it together but not too tight that it loses its shape. You can also use a hair tie if you prefer that look.
Step 5: Decorate Your Flower
To finish your sock flower, you can add a small decorative item at the center. This can be a button, a bead, or anything else decorative. It adds a special touch and makes your flower unique.
Decorating Your Flower Arrangements
Now that you have made different types of flowers from baby clothes, it is time to think about how to present them. Decorating these flowers can enhance their look and make them suitable for gifts or decorations.
Using Ribbons
A lovely way to enhance your flower arrangements is to use ribbons. You can tie a ribbon around the rubber band at the base of your flower.
Adding Greenery
You can also add some green leaves made from paper or small fabric pieces around your flowers. This gives a nice contrast and makes your flower arrangement look more complete.
Creating Bouquets
If you have made several flowers, gather them into a bouquet. Tie them together using a larger ribbon or string. This creates an adorable gift that anyone would cherish.
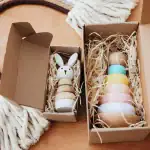
Using Decorative Boxes
To present your flower creations, consider placing them in a decorative box or basket. This adds a beautiful touch for gifting at baby showers or birthdays.
Tips for Perfecting Your Flower Folding Skills
Here are some helpful tips to ensure your flowers turn out beautifully every time:
- Choose soft fabrics for easier folding.
- Practice on a single piece before creating a bouquet.
- Experiment with different sizes of clothes for varied flower sizes.
- Use colorful items to make your flowers more vibrant.
- Don’t rush. Take your time to fluff and arrange your flowers nicely.
By following these tips, you can improve your folding technique and make beautiful flowers every time. Each creation reflects your personality and care.
Creative Uses for Baby Clothes Flowers
Once you’ve mastered the art of folding baby clothes into flowers, it’s time to think about how you can use them. Here are some fun ideas:
Gifts for Baby Showers
These flowers make fantastic gifts for baby showers. You can present them in a basket or box and add a little note for a personal touch.
Nursery Decor
Use these folded flowers to decorate your baby’s nursery. Arrange them in a vase or hang them as wall decorations. They can brighten up the room and bring a playful vibe.
Party Decorations
If you’re throwing a party for a little one, these flowers can serve as table centerpieces. They add color and cheer to the atmosphere.
Fun Activities
You can turn folding baby clothes into a fun activity with friends or family. Gather together, choose clothes, and have a delightful time creating flowers while chatting and sharing ideas.
Folding baby clothes into flowers is not only a practical way to organize baby items, but it’s also a creative and enjoyable activity. By following the simple steps outlined in this article, you can easily create beautiful flower shapes from onesies, T-shirts, socks, and more. This charming craft will surely add a unique touch to your gifts and home decor. So, gather your supplies, let your creativity flow, and start folding those adorable baby clothes into flowers today!
Frequently Asked Questions
What materials do I need to fold baby clothes into flowers?
You need baby clothes, preferably soft ones like onesies, a flat surface, and optionally, rubber bands or hair ties to secure the flowers.
Can I use any type of baby clothes for this folding technique?
Yes, you can use any type of baby clothes, but soft fabrics work best for a beautiful flower shape.
How do I start folding baby clothes into flowers?
Begin by laying the baby clothes flat. Fold the sleeves and bottom hem inward, then roll the fabric tightly from the bottom to the top to form a flower shape.
Is it difficult to fold baby clothes into flowers?
No, it is quite simple. With a little practice, you can easily fold baby clothes into flowers.
Can I add leaves or stems to the baby clothes flowers?
Yes, you can add green fabric or paper as leaves and use a stick or ribbon as a stem for a more complete flower look.
How can I keep the flower shape intact?
Use a rubber band or hair tie around the base of the flower to hold it together and maintain its shape.
How long does it take to fold a baby outfit into a flower?
It usually takes about 2-5 minutes to fold one baby outfit into a flower, depending on your speed and skill level.
Can I use this technique for other types of clothes?
Yes, you can use this technique for small clothes like toddler shirts, socks, or even washcloths.
What can I do with the folded baby clothes flowers?
You can use them as gifts, table centerpieces, or fun decorations for baby showers or nurseries.